Gates are both an important aesthetic and practical component of any garden. If you’re taking the step of installing a gate in your garden, it’s crucial that the installation is both precise and high quality. With this in mind, we have created a guide to help our customers when they are installing any of the wooden gates in our range, to ensure that you get the most out of your purchase.
Treatment
All of our timber gates are pressure treated as standard, to provide superb protection against rot. This means that no further treatment is necessary. However, you can still stain or paint your gate in whichever colour you desire, using paint or stain that is compatible for use with pressure treated timber. 
If you wish to change the colour straight away you can stain the wood using Protek Timber Eco Shield, or it can be painted after it has been allowed to weather for at least 3 months using a product compatible for use with pressure treated timber.
Don’t mistake the green marks on the wood for mould - this is just a residue from the pressure treatment process, and this will fade back to the natural colour over time.
Storing Prior to Installation
It is important to store your gate correctly prior to installation. We recommend that you store the gate laid down on a flat surface. This will prevent the gate from twisting and the timber from warping. Also avoid exposing the wood to extreme heat, dryness or humidity or being submerged in water.Installing Posts
Before you can affix the gate properly, you’ll need to install the necessary support structure.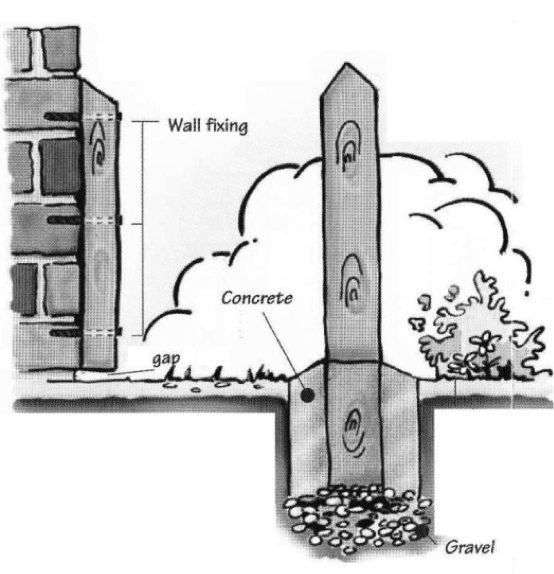
Wall-Mount: A wooden post can be fixed to a brick wall using frame fixing screws or masonry bolts (not supplied). When wall mounting a post, make sure you leave a small gap between the ground and the bottom of the post to avoid trapping moisture. This will help to extend the life of your post.
Concrete-In: When burying a wooden post into the ground, the hole should be approximately two to three times the width of the post and approximately one third of the post should be below ground. Once you have dug your hole, fill with 20cm of gravel to aid drainage and extend the life of the post. Sit the post on the gravel and fill the remaining hole with concrete. Use a spirit level to make sure your post stays vertical as you fill with concrete. Check the drying time of the concrete you are using and do not hang the gate until it has hardened, which is usually 24 hours or more after pouring.
Fitting the Gate
IMPORTANT! Wooden blocks have been nailed to the bottom of the gate to protect the corners whilst in transit. These should be removed before fitting the gate.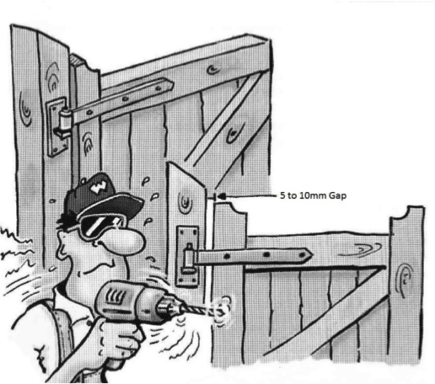
Decide how much of a gap you need between the bottom of your gate and the ground. This would be typically 25-50mm (1-2”) to provide clearance of any unevenness in the ground when the gate is opening. Position the gate between the posts and place some packers underneath it to hold it in place. Now place packers either side of the gate to even out the gaps and hold the gate in place whilst fitting the hinges. The gaps between the gate and posts should be around 10mm.
The hinges should be positioned so that the screw holes align with the centre of the gates horizontal frames at the top and bottom of the gate. The centre of the gate’s hanging stile is the optimum position for the bolts, and great care should be taken to ensure that bolts are not installed into the shoulder joint of the gate; as this could severely damage the gate, or even render it unusable.
Evington Field Gate
 As a larger gate, the installation of the Evington field gate is slightly more complex, but also more customisable. For one, the Evington field gate can be installed to open either in one or both directions.
 Installing Between Posts
With this method of installation, the gate hinges are attached to the inside face of the post, allowing the gates to open in either direction. If you ordered the optional Timber Fittings Pack from Garden Oasis, the hinges will require a gap of around 10cm between the gate and post and the Spring Fasteners Set requires a gap of 9cm.If installing a pair of gates, the overall amount of space you will need to leave between the posts will be the size of the gates plus 21cm (10cm both sides for hinges plus 1cm gap between the centre of the gates).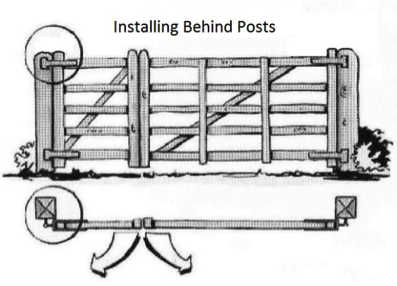
With this method of installation, the gate hinges are attached to the back (or front) face of the post, allowing the gates to open in one direction. When installing this way, the gap between the posts should be up to 10cm less than the size of the gate (or gates) and is a suitable method of installation for a single or pair of gates.
 Then select "Add to Home Screen"